Showing posts with label cupcakes. Show all posts

Thursday, September 2, 2010

Mint Chocolate Cupcakes

mint chocolate.
Hi! How are you? Sorry we have been out and about so much lately. But, I'm back, and I have a recipe to share with you. I do feel a little guilty about this one, though. Mostly because I just feel like it's not as spectacular as a lot of other recipes.

But, who knows. Maybe it will really strike your fancy, in which case I'll be so glad I shared.

A couple things about these cupcakes: One. I don't think the chocolate cupcake tasted very chocolatey at all. And, the frosting was almost too butter-y (Yeah. I didn't know it was possible either.). Regardless, they were still a treat. They required quite a bit of effort, but you'll probably be really pleased with the results. And, if you're not a complainer like I am right now, then you'll love them and want to eat the entire batch by yourself.
cute liners.
mini and giant.
Mint Chocolate Cupcakes
Adapted from Martha Stewart

Makes about 12 regular and 12 mini-sized cupcakes or 18 regular cupcakes

Ingredients
For the cupcakes:
1 1/2 cups all-purpose flour

3/4 cup unsweetened Dutch-process cocoa powder
1 1/2 cups sugar
1 1/2 teaspoons baking soda
3/4 teaspoons baking powder
3/4 teaspoons salt
2 large eggs
3/4 cup buttermilk*
3 tablespoons canola oil
3/4 cup warm water
1 1/2 teaspoons peppermint extract

For the frosting:
2 large eggs, separated
1/2 cup sugar
2/3 cup milk
1/3 teaspoon pure vanilla extract
2/3 cup coarsely chopped fresh mint leaves
1 pound (4 sticks) unsalted butter, room temperature
1/4 teaspoon peppermint extract

Directions
For the cupcakes:
1. Preheat oven to 350 degrees. Line standard muffin tins with paper liners. Whisk together flour, cocoa powder, sugar, baking soda, baking powder, and salt. Add eggs, buttermilk, oil, water, and peppermint extract, and beat with a mixer on low speed until smooth.

2. Divide batter among muffin cups, filling each 2/3 full. Bake, rotating tins halfway through, until a tester inserted in the center comes out clean, 20 to 25 minutes. Let cupcakes cool in tins on wire racks for 10 minutes. Transfer cupcakes to racks, and let cool. Undecorated cupcakes will keep, covered, for 1 day, or frozen for up to 2 months.


For the frosting:
1.
Whisk together yolks and 1/4 cup sugar with a mixer on high speed until pale and thickened, 2 to 3 minutes.


2.
Prepare an ice-water bath. Bring milk, vanilla, and mint leaves just to a boil in a medium saucepan. Remove from heat. Whisk about 1/3 of milk mixture into yolk mixture. Pour yolk mixture back into pan with remaining milk mixture, and whisk to combine. Place over medium heat, and cook, stirring constantly, until custard registers 185 degrees on an instant-read thermometer. Remove from heat; strain through a fine sieve into a bowl. Set bowl in ice-water bath, and stir until cool.

3. Beat butter with a mixer on medium-high speed until pale and fluffy. Add chilled custard to butter, and beat until incorporated.

4. Heat whites and remaining 1/4 cup sugar in a heatproof mixer bowl set over a pan of simmering water, whisking constantly by hand until mixture is warm to the touch and sugar has dissolved (the mixture should feel completely smooth when rubbed between your fingertips). Attach bowl to mixer fitted with whisk attachment. Starting on low, and gradually increasing to medium-high speed, whisk until stiff peaks form.


5. Add egg-white mixture to butter mixture, switch to paddle attachment, and beat on medium-high speed until smooth. Beat in peppermint extract. Use immediately, or cover and refrigerate for up to 3 days or freeze up to 3 months. (Before using, bring to room temperature, and beat on low speed until smooth.)

6. Spoon buttercream into a pastry bag fitted with a large, plain tip. Pipe small mounds on tops of cupcakes. Flatten mounds with an offset spatula, then top with chocolate-mint leaves.

* Making your own buttermilk is easy: Add one tablespoon of vinegar or lemon juice to one cup of milk. Let it sit until it clabbers, about ten minutes, and proceed to use it as you would store bought buttermilk!

- The Florida Sister

Wednesday, June 16, 2010

Beating Buttercream

When I started making these cupcakes I had no idea it would become an epic battle between me and swiss meringue buttercream frosting. I saw the recipe in my Martha Stewart cupcake book and strawberries are my favorite ingredient of late since they're in season full swing, and come on who can resist that picture next to the recipe. The cupcake looks perfectly delicious! The batter was pretty simple and delicious. It wasn't until I got to the frosting that I started having some challenges.



My first batch of frosting (yes there was more than one) seemed like a disaster, which was pretty disheartening seeing as it took about 20 minutes to make (15 of which was spent whisking with an electric hand whisk). After I added the butter in it just kinda turned into a soupy mess, which seemed to have no hope of sticking on a cupcake. So i threw it out. I might not have made another batch, but my eternally optimistic and wonderfully supportive fiance, Mark, insisted I should try again and that he would help whisk.

I decided to do some internet research first and found with great delight that Deb of Smitten Kitchen had made this frosting and had THE SAME PROBLEM! She said the key is not to give up hope and to keep whisking after adding the butter.

So. Take two. This time I added salt to the eggs while heating ( I picked this up in another post about this frosting). The eggs stiffened much more quickly the second go round (thank goodness). It took about 10 minutes to reach this stage and then I proceeded on to adding the butter. Once again soup, but this time I knew to just keep going. After another 10 minutes my arm was getting sore. "Damn it Martha!" I thought. You and your perfect cupcakes of deliciousness. It can't be easy huh? And Mark had dozed off on the couch. I was all alone with my soupy frosting. 5 more minutes had passed and I was distracted trying to kill a fruit fly. I looked down and voila! It had changed from soupy terribleness to creamy wonderfullness! I was thrilled!!!!!! I proceeded to prepare a pastry bag with the frosting and after frosting them (which was so much fun!) I was rewarded with the cutest tastiest cupcakes ever.


The recipe! I made a half batch which made 12 dozen regular sized cupcakes and a dozen mini cupcakes. So I'll include the already cut in half measurements for that because who needs 34 of these delicious ever so tempting treats around.

Batter:

1 and a little less than 1/2 cup all-purpose flour
1/4 cup cake flour (not self-rising)
1/2 tablespoon baking powder
1/2 tsp salt
1 stick o' butter (room temperature)
1 + 2 tbs sugar
1 tsp vanilla
2 small eggs and 1 small egg white
1/2 cup milk
1 c finely chopped fresh strawberries (about 10)

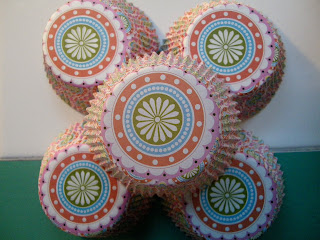
1. Preheat oven to 350. Line muffin tin with paper liners (I got THE cutest liners at Michael's pictured above...I couldn't resist. They were 1.99 for 75!). Sift together both flours, baking powder, and salt (I don't have a sift so I just fluff it with a fork).

2. With an electric mixer combine butter, sugar, and vanilla until smooth. Add eggs and white one at a time and beat until each is incorporated. Add flour in two batches, alternating with milk. Fold in chopped strawberries by hand.

3. Fill cups about 3/4 full. Bake, rotating tins halfway through, until a knife inserted in centers comes out clean. It took my cupcakes about 30 minutes and the mini ones 20. Cool on wire racks. Store in airtight containers.

The Ever So Challenging- Strawberry Meringue Buttercream:

3/4 c fresh strawberries chopped
2 egg whites
1 pinch o' salt
1/2 c + 2 Tbs sugar
1.5 sticks o' butter

1. Puree strawberries in food processor (I just used my blender). Combine egg whites, sugar, and pinch o' salt in heatproof bowl over a pan of simmering water. Whisk constantly until mixture is warm and sugar has dissolved (you should test this by rubbing the mixture between your fingers...if it's smooth it's good to go...this means your eggs have reached a safe temperature for consumption).

2. Whisk away until stiff peaks form (you need an electric whisker for this...for sure). This took me at least 10 minutes. The mixture should be pretty cool by this point.

3. Add butter one tablespoon at a time, and then whisk whisk whisk whisk whisk (once again...electric whisk is key). Don't lose heart after 10 minutes when nothing has changed. It took me 15 minutes after I'd added all the butter. I promise it will come together. After it has thickened and looks like frosting beat with a regular mixer for 2 minutes. Add strawberries and mix some more.

4. If you want to be fancy and fun fill a pastry bag and frost away. I used a star shaped tip that I got at Michaels. If you want to take the easy route you could just slather some on. It's delicious. You can store your frosting in the fridge for 3 days or the freezer for a month. Just bring to room temperature and mix before using again.

5. ENJOY! Share! Yum!

Wednesday, May 26, 2010

carrot cupcakes.

in a row.
finely grated carrot friends.
Often times I like reasons to bake. I don't think I need a reason, but I feel better about baking something relatively unhealthy if there's a justifiable reason for eating it. Get it? So, when I learned that my sister would be coming home for a whirlwind trip I knew I needed to bake something. And it needed to be good. I'm a really, really big lover of Deb over at Smitten Kitchen. Like, really big. And when I saw these cupcakes I knew I needed to bake them. I cut the recipe in half because there's just no reason to have 24 cupcakes lying around taunting you.

12 is a much more manageable number.

Much more adult and grown up. And you know what else is grown up? Reducing the amount of sugar in the recipe, which is exactly what I did. Really, though. These taste totally fine by reducing the amount of sugar by 1/4 cup (in the actual cupcake, not the frosting).
yuuuum.
And, you know what else? These are delicious without any frosting at all. And since they're made with canola oil we mine as well be calling them health food, right? Right.

However, if you are going to frost these cupcakes (and I highly recommend you do. Just set a few naked ones aside for breakfast.) I suggest adding more maple syrup if you really want to taste it. If you just want a little hint, then follow this recipe to a tee. But, if you're like me, and you were looking for a little more maple syrup kick, I'd go ahead and add a few more glugs.

Enjoy these fresh out of the oven or the day after, or the day after that, or even the day after that. Really. These taste delicious days after being made.